Saturday, June 2, 2012

Cheese Gyoza (Potstickers?)

I'm not a cook, I don't really like cooking, but I do it out of necessity and to save money...we gotta eat and  restaurants every night would be out of our budget...so...I cook :) 
Every so often I come up with an idea for something grand, and then I cook it quite a bit till we're sick of it. Right now it's these DELICIOUS cheese gyoza!


1. Buy some gyoza wrappers (I think wanton wrappers will work too!)
Cut your cheese into little squares, not too thick.


2. Place cheese in center of wrapper, fold over edges...


3. Fold over open edges to surround the cheese (you really don't want any open edges)...


4. Prepare all your pieces before you start frying... they fry up pretty quick...


5. Heat up about 1/2 inch of oil in your pan...I used olive oil, but grapeseed would work too, or any oil. Heat should be around low medium...I let mine get too hot, when the oil starts to smoke, it's too hot...


6. Fry on one side (I put folded sides down first, to seal them), until light gold and bubbly, then turn over 
(I find cooking chopsticks work best for this)


7. Remove to plate ... I put a paper towel to absorb excess oil, but there wasn't much extra oil..
8. Eat and enjoy!

Gyoza wrappers can be filled with chocolate chips (below), anko (sweet bean paste) and probably a lot of other things I haven't thought about. Nice for a snack, side-dish or party appetizers!


Monday, April 30, 2012

A Truly Scrappy Rug!

Two years ago I raided my Mom's scrap basket. She keeps it just for me (at least, that's what I tell myself!!) I was lucky to find a nice sized pile of coordinating fabrics already cut up into triangles and squares, I think Mom started something that didn't turn out as she'd hoped, and tossed it into the basket. So, I snagged it up, lugged it over the ocean and threw it into my own scrap basket! 

Every few months I'd go through the basket, pulling out some scraps for some small project, and mull over this particular set, wondering what on earth I could turn it into. No ideas sprang into mind, so back into the basket it went. I only knew that it was destined for something wonderful!

Last Friday the urge to SEW hit me. I didn't want to bother with patterns, too much cutting and measuring, deciding on colors...and it hit me, I knew what to pull out and just sew! And so I did, out came the scrap set, and the machine, and I sat myself down to sew. And slowly, it emerged...and idea that took shape and formed itself into a final beautiful piece of art!

Generally, I HATE sewing triangles, they never work out right for me, but since this scrappy project had no definition or aspirations of perfection, I slowly began sewing the triangles together, each triangle sewn to a different colored fabric. From there I matched them together by color, to form half a diamond, and then added tops to make whole diamonds. 

Once that was done I thought 'It needs to be set off a bit or else there's too much unmatched patterns going on...
So I pulled out a plain piece of silver cloth I had on the shelf, cut some strips and added a border. Originally I had planned to sew the little squares into 9 patches and make coasters out of them, but brilliance struck and they were added to the project to create one more border. Of course, there weren't enough of the 2x2" squares to go around 4 sides, but fortunately there was a small set of 2.5x2.5 squares that fit perfectly along one side.


I tried out a method for layering the quilt using some masking tape on the bottom fabric to tape it to the floor, then laying the batting, then the quilt on top, used my bent safety pins to baste it all together and pulled out my quilting foot feeder for sewing in the ditch. But...I think because the triangles were distorted a bit, the quilt developed a lot of puckers as I went and the quilting didn't turn out as beautiful as it was in my mind.

Once I sewed some straight lines to keep it all together, I switched to my darning foot and some brown thread to do free-motion quilting in the middle of each diamond. Added some binding to the edges and 

Ta-dah! Here it is! A truly scrappy rug!! Perfect for my sewing room which needed a small rug, though I have a strong suspicion this may become a flying carpet for little man since he's been trying to get it from me at each step of the sewing process! 


Friday, April 6, 2012

Scrappy Bits!

Using up scraps in gifts and useful house decor!

Tissue Case Covers...blue one is for a friend's son (Mario Bros), the other two are leftovers from a Robert Kauffman collection [pattern here]


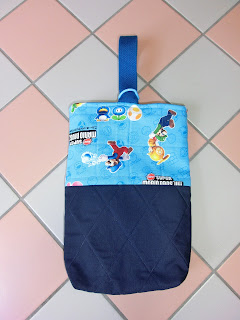
Shoe bag for a friend's son who is going into 1st grade. Mario Bros fabric with dark blue accent.


Scrappy coasters using up more Robert Kauffman leftovers


Wild assortment of scraps sewing randomly into a block, edged with dark brown border and cream colored binding. I've finally figured out the dimensions to cut binding if I want to sew rather than hand-stitch the back.
Cut 2" strips and sew to the edge at 1/4th inch. Works perfectly!


Used Frixion highlighters to draw a free-motion pattern, and quilted with my darning foot. 


 Here it is on the dining room table with my candles.


Sunday, March 4, 2012

Late Night Progress

Stayed up till past 11 last night, wanted to finish this quilt top, it took me just over 2 weeks to iron/cut/piece this together, and all in all, I say it was quick work and lovely fabric to work with! The question is, how long will it take me to now back/bind/quilt it? I can get this far pretty fast, but the last half often takes me a few months, if not years, to do! If I leave the top hanging up over my shelves, I might get to it quicker, just to get it out of the way! Otherwise, I'll move it to some empty wall in the house and figure it looks so pretty hanging there, what's the point in finishing it off?


And then I decided to use some of the small scraps to make some tea mats...this is the beginning, I plan to sew add some plain white or beige to it to balance off the brown which is rather overwhelming


And since it wasn't quite 11 yet, I figured, I've got all my tools out, why not cut the white square backgrounds I need for my grandmother's garden quilt, so I cut out 4 11x11" squares and pinned the grandmother's flowers to them, prepping for machine applique sometime in the near future:

Then I debated whether or not I should pull this project off the wall and complete it or not (decided not, since it was 11 now and my eyes were starting to blur images). This will become a table runner for my daughters' piano teacher whom they have been going to for close to 12 years now:

And finally, (didn't make THIS at 11, but earlier in the day) I managed to make the 18-y/o's birthday pie (chocolate cream) and we had pie together to celebrate her becoming an adult!
Ooops, this is the finally! A double-wrap men's bracelet with lots of black, grey, touches of crystal and moonstone, with one of the beautiful new buttons I got from the States this month! This already has 2 orders put in for it! Yeah!

Monday, February 20, 2012

Sewing Therapy!

My life has been absorbed lately with the Off on a Whim business experience! But, even that needs a break, and so I swore I'd dig into sewing this weekend. Didn't actually get any sewing done, but I did get almost all the pieces cut out and plan to begin piecing this week. Luckily for all my projects....and my sanity!...I have a separate sewing room, and barring any private students, I can leave my projects out indefinitely, no cleaning up, no pulling back out.

So, this month's project is this adorable little quilt from the monthly quilt club my dearly beloved mom signed me up to. The pastels are making me yearn for spring...please oh please come soon and stay long!

So, here is what the quilt should basically look like, a sort of log cabin....


And here are some of the fabrics waiting to be cut...

And here are some that I've cut up...just 1-1/4" strips of different lengths...


And since I hate wasting any scraps, I collect all strips that are long enough to be used, and up-cycle them into...


A rag rug! This is my second one in the making...


Friday, January 13, 2012

Baskets!

Continuing with my New Year's Sewing Craze, I pulled a random kit off my shelf, opened it up and it was this colorful baskets mini-quilt from The Temecula Quilt Company. So, although I struggle with applique, I decided to sit myself down and do this kit! I was able to finish it up in about 4 days of off and on sewing, including appliqueing the handles and hand embroidering around each basket. Phew! The good news is, I finished off the last season of Smallville during the sewing frenzy!
I used some fabric I picked up locally (by locally I mean, somewhere in Japan, not across the ocean...) to back and bind it, and of course remembered my little 'handmade' tag...
All ditch quilting was done on the machine, but all basket outlines was done by hand using leftover DMC #25 thread from long-finished cross-stitch projects.
Even the best (and amateurs of us) make mistakes. Here's one square that got pretty off-center.

Another basket close up...

As it turned out, I love this little mini-quilt. It's so colorful and yet not overwhelmingly so. It will soon find a new owner as it makes its way over the ocean at some point in time this year!

Tuesday, January 3, 2012

New Year's Craze

With the kids gone to their grandpa's for 3 days, I found there was no need to clean/cook/shop/get dressed or wear makeup! It's been so long since I did sewing that I threw myself into 3 days of pure sewing, and catching up on my favorite TV shows!

I worked on these patches for the Temecula Quilt Company's 12 Days of Christmas sampler...

I threw a bunch of boy scraps together (after first making 3 boys' scarves...pictures later!) into a scrappy patch that might evolve into a boy's tote-book bag...


I finished off a stuffed elephant in preparation for many new babies coming into my life this year...

And finished off a scrappy baby blanket started by my 14 y/o daughter for our friend's new daughter ...

All in all, it was a fantastic break and wonderful to get back in touch with sewing!